How to Prepare Print-Ready Files: Bleeds, Crop Marks, and DPI Explained
We often see perfectly good designs ruined by simple setup errors. The difference between a flawless print and a frustrating reprint usually comes down to file preparation. You probably know the frustration of receiving materials with blurry text or cut-off content.
Our professional service team understands that mastering How to Prepare Print-Ready Files: Bleeds, Crop Marks, and DPI Explained takes a little practice. This guide translates these technical terms into plain English for homeowners and business owners alike. You will learn exactly how to protect your designs before sending them off.
We compiled these practical tips to help you avoid the most common printing mistakes. Let’s look at the specific requirements your files need to meet.
Your next print run will look exactly as you intended.
What Is a Bleed and Why Does It Matter?
Our experts want you to know that paper cutting is a physical process with slight variations. When a printed piece is cut down to its final size, the blade does not always land with perfect precision. Industrial guillotine cutters in US print shops have a standard tolerance of plus or minus 1/32 of an inch.
We use a bleed to solve this exact problem. A bleed extends your background color or image an extra 0.125 inches beyond the trim line. That extra overlap gets cut off, giving the cutter room for slight variation without leaving any white gaps.
We recommend adding this 0.125-inch extension on every affected side of your design. A standard 8.5 by 11-inch US flyer needs a final file size of 8.75 by 11.25 inches to accommodate a full bleed. Most design software like Adobe InDesign or Canva Pro gives you an option to include bleed marks during the PDF export.
Our team relies on this setting to ensure flawless edges. Here are the specific bleed requirements for common US print sizes:
- Standard US Letter at 8.5 by 11 inches expanding to 8.75 by 11.25 inches
- Standard Postcard at 4 by 6 inches expanding to 4.25 by 6.25 inches
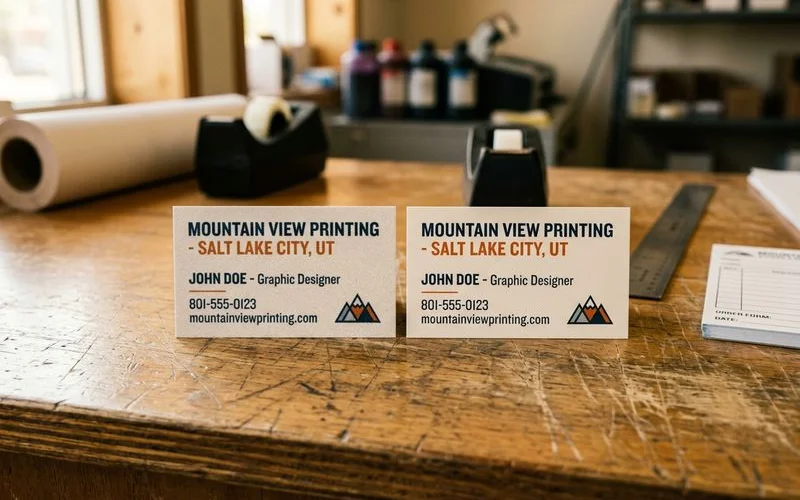
- Business Card at 3.5 by 2 inches expanding to 3.75 by 2.25 inches
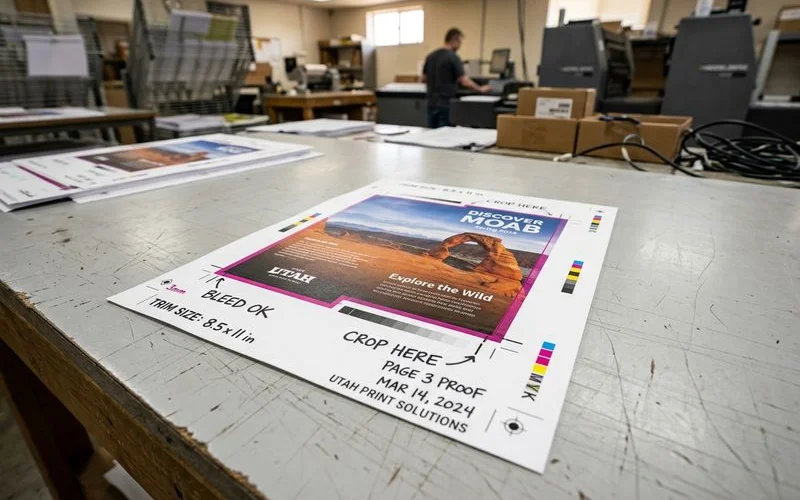
The Safe Zone: Keep Important Content Away from the Edge
The flip side of bleed is the safe zone, sometimes called the live area. We always tell clients to keep important content pulled in from the trim line. A safe zone of 0.125 inches is the absolute minimum standard.
Many designers prefer 0.25 inches for text, since even a properly cut document looks visually crowded near the edge. We see this mistake frequently on direct mail pieces. The United States Postal Service requires very specific safe zones for mailing compliance in 2026.
Postcards need a clear zone of 5/8 inch at the bottom for the Intelligent Mail barcode. Our layout templates always include these strict postal margins. Anything critical like logos, text, or faces should live safely inside these inner boundaries.
| Content Type | Minimum Safe Zone Margin | Special Requirements |
|---|---|---|
| Standard Flyers | 0.125 to 0.25 inches | Keep logos and text inside |
| Business Cards | 0.125 inches | Avoid borders near the edge |
| USPS Postcards | 5/8 inch at bottom | Required for postal barcodes |
Keeping text away from the edge guarantees it will not be clipped. We define the trim line as the exact spot where the cut happens. The safe zone sits securely inside the trim area.
Your important content lives comfortably in the middle.
What Are Crop Marks?
We rely on crop marks to guide the cutting blade accurately. Crop marks, also known as trim marks, are the thin lines that appear at each corner of a document. You will see them on press-ready PDFs and printer proofs to show the exact cutting path.
We prefer these marks to be drawn as 0.25-point lines. Standard crop marks are typically offset by 0.125 inches from the actual artwork. This specific offset ensures the lines are completely removed during the final trimming process.
We need you to include crop marks in your PDF export before sending a file. Finding this setting is simple in most design programs. Here is how to enable them in popular software:
- Adobe InDesign check boxes under Marks and Bleeds
- Adobe Illustrator trim marks selection in the export dialog
- Canva Pro crop marks and bleed option before downloading
Our print technicians at My Color Copies can add crop marks for you if your file lacks them. Just let the team know when submitting your order. This small detail saves a tremendous amount of time during production.
DPI: Why Resolution Matters More Than File Size
We frequently encounter confusion regarding DPI, which stands for dots per inch. DPI measures how much detail your image contains per inch when printed. Screens display at 72 to 96 DPI, explaining why a sharp monitor image often prints soft and blurry.
Our baseline rule of thumb for standard US print projects is 300 DPI at the final printed size. People often assume a large file size in megabytes automatically guarantees high resolution. An image saved at 72 DPI and stretched to fill an 8.5 by 11-inch page will still print terribly.
How to Verify Pixel Dimensions
We advise checking the actual pixel dimensions and resolution settings. A standard 8.5 by 11-inch print at 300 DPI requires an image that is at least 2550 by 3300 pixels. A business card at 3.5 by 2 inches needs at least 1050 by 600 pixels.
The Viewing Distance Rule for Large Format
We adjust these requirements based on the viewing distance of the final product. Large format printing follows a completely different set of rules. Here are the standard DPI targets based on how far away your audience stands:
- 1 to 3 feet viewing distance requires 300 DPI
- 10 to 25 feet viewing distance requires 100 to 150 DPI
- 50 plus feet viewing distance requires 25 to 50 DPI
Our large format specialists who handle poster printing and banner printing note that lowering the DPI for distant viewing keeps file sizes manageable without sacrificing perceived quality. You can use the Adobe Acrobat Preflight tool to verify your file’s resolution before submitting it. Proper verification prevents unexpected pixelation on your final product.
We strongly discourage trying to upsample a low-resolution 72 DPI image in Photoshop. That process rarely yields good results. You should consider using vector artwork for logos and text, since it scales to any size without losing quality.
Color Mode: RGB vs. CMYK
We always urge designers to check their document color mode before exporting. Screens use RGB colors, which stand for Red, Green, and Blue, because they emit light. Printers use CMYK, representing Cyan, Magenta, Yellow, and Black, because they layer ink on paper.
We use automated software to convert RGB files, but the conversion is not always perfect. Highly saturated colors like bright neon greens or royal blues often shift and flatten out into muddy tones. The standard CMYK profile used across most US print shops in 2026 is U.S. Web Coated (SWOP) v2.
Our recommendation is to convert your file to this specific CMYK profile before generating your final PDF. Finding this setting varies depending on your software:
- Adobe Illustrator color mode adjustment under the file menu
- Adobe Photoshop image mode selection
- Adobe InDesign document setup preference during initial creation
Some tools like Google Slides or the free tier of Canva do not support CMYK export natively. We suggest using PANTONE spot colors for precise brand matching if your project allows it. A professional printer can match these specific spot colors perfectly.
This approach guarantees your company logo remains consistent across all materials. Our prepress team can review your RGB files and advise if the color shift will be noticeable. Just let the staff know you need a color check.
Catching these color shifts early saves money on reprints.
Quick Pre-Flight Checklist
We put together this quick pre-flight checklist to run through before sending your file. Exporting your file as a PDF/X-4 is the modern gold standard for US commercial printing. This specific ISO standard preserves live transparency and color management perfectly.
- Document size matching the final printed size plus the required bleed
- Bleed set to 0.125 inches on all bleeding edges
- Critical content positioned safely inside the 0.125 to 0.25-inch safe zone
- Images scaled to 300 DPI at the final print size for close viewing
- File exported as a high-quality PDF/X-4 rather than the smallest file size option
- Color mode converted to CMYK using the U.S. Web Coated (SWOP) v2 profile
- All text fonts fully embedded or converted to outlines
Ready to Print?
We know that properly set up files mean fewer reprints, faster turnaround times, and stunning final products. Your prints will look exactly like your original design.
A clean file makes the entire production process seamless. Our team will gladly review your file before running the job if you feel unsure about any of these settings.
Explore the dedicated Color Copies service page to see available options. You can also request a quote today to get started.
We will guide you through the file preparation process from start to finish. The final result will meet your expectations perfectly.
Give your next project the professional touch it deserves.
My Color Copies Team
Print Production Specialists
My Color Copies is a Utah-based print team serving both local and out-of-state customers with affordable, fast printing services.
Digital Printing ExpertiseNeed help with your print job?
We are here to help with file prep, paper choices, and pricing.
Request a Quote